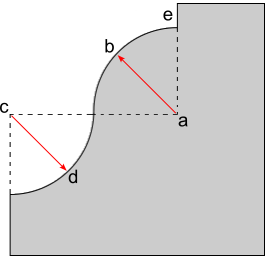
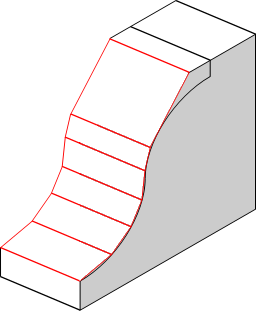
The cyma recta is a classical moulding based on the union of an ovolo and cavetto mould. The mould in it’s simplest form consists of a fillet e, a quarter circle radius a-b, and a quarter circle c-d. The cyma recta, along with it’s inverse the cyma reversa, are commonly referred to as an ogee mould.
Steps For Working A Cyma Recta Mould
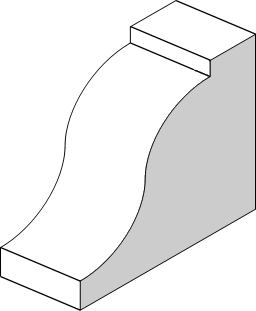
- Applying the template to the stone
- Working the initial chamfer
- Working the initial chamfers of the lower element
- Working further chamfers on the lower element
- Finishing the lower element
- Working the fillet
- Working the upper chamfers
- Finishing the cyma recta mould
Applying The Template To The Stone
The process of working a cyma recta mould begins by marking the template onto the parallel joints of the stone using a scriber. Templates for stone are traditionally made from zinc sheeting. Using a scriber as opposed to a pencil ensures the accuracy of work and removes the need to constantly reapply and redraw the mould on the stone.
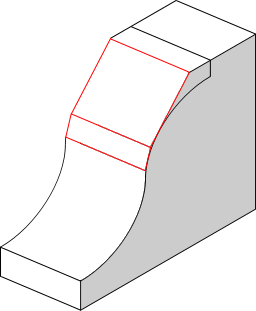
Working The Initial Chamfer
The next step is to scribe a large chamfer on the stone. Note from the picture that the chamfer is marked on such that it touches two points on the mould. Working to two points of the mould like this maximises efficiency. In this particular example the chamfer touches the bottom edge of the mould, and the extremity of the upper curve.
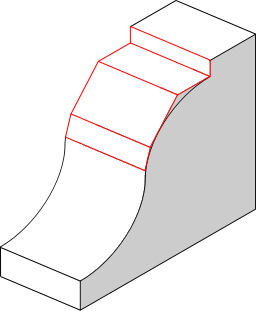
Working The Initial Chamfers of The Lower Element
With the large chamfer finished, two further chamfers are marked on the lower element of the mould. These chamfers are worked in the stone and their trueness checked with a straight edge to ensure accuracy.
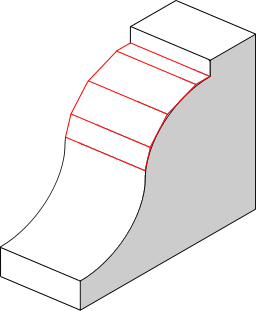
Working Further Chamfers Of The Lower Element
With the initial chamfers of the lower element worked, further chamfers are introduced to refine the shape. The number of smaller chamfers worked isn’t a fixed amount, rather it’s a process repeated until the flat of each sits just above the scribe line of the hollow of the mould. The marking of the chamfers is done with a sliding bevel to ensure they are the same angle and parallel. In geometry, the chamfers would be called chords; a straight line that touches the inner edge of a curve at two points.
Finishing The Lower Curve Of The Mould
The lower element of the mould is now worked down to the scribed line with a bullnose chisel. The chisel is worked parallel to the face of the stone and the accuracy is checked with a straight edge.
Scribing And Working The Fillet
The working of the remainder of the cyma recta mould begins by the scribing and working of the fillet. The fillet is marked on parallel to the top bed of the stone, and the horizontal and vertical faces are worked together and checked with a straight edge for trueness.
Working The Chamfers Of The Upper Element
The upper curvature of the cyma recta is refined by scribing and working a series of chamfers. The chamfers are marked on each end of the stone using a sliding bevel or shift stock to ensure the ends of each chamfer is parallel. Further chamfers are worked at tangents to the curve until such point that the upper part of the mould becomes refined enough to be easily finished.
Finishing The Cyma Recta Mould
The curved elements of the mould are now tooled over with a bolster and dummy to refine and join together both sections. The resultant finish should present no high or low spots, and the two curves should merge together seamlessly.
A PDF version of this page is available