
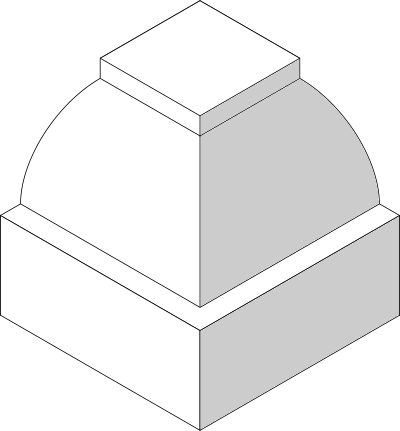
In stonemasonry, when a moulding changes direction to follow the shape of the stone it’s called a return. Irrespective of the change in angle, whether simple or compound, the resultant mitre will always form a straight line.
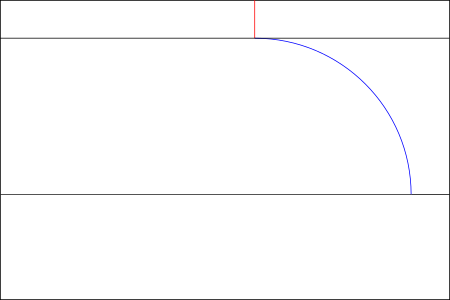
Using the ovolo as an example, it can be seen that with a return of 90°, viewing the stone from 45° demonstrates the mitre forms a straight line where the two faces of the mould intersect.
For the setting out example, the ovolo mould will be used, and it will follow a return of angle of 90° from the face of the stone. In this case the return is a continuation of the mould, intended if it were a corner stone for a plinth course et cetera. Other types of returns are a return and stop, and a return and break.
Processes Involved In Setting Out A Return
- Marking the mould on the end of the stone
- Marking on constants and chamfer lines
- Marking on the mitre
- Marking on the initial chamfer
Marking The Mould On The End Of The Stone
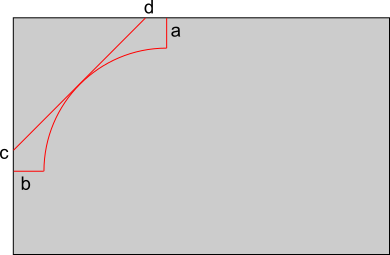
The first thing needed is to scribe the mould on the rear of the stone. The initial chamfer c-d can also be marked on at this stage. The mould will be the same as used and worked across the face of the stone.
It’s to be noted that a return can only be fully marked on after the face it’s tangent to has been completed. The exception to this is with an internal return angle where the two intersecting surfaces are worked at the same time to form the mitre.
Marking On Constants And Chamfer Lines
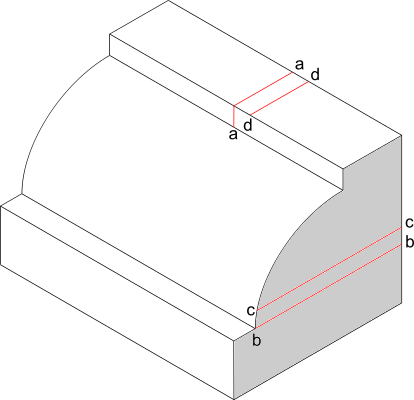
With the mould and initial chamfer marked on the rear of the stone, the lines a-a, b-b, c-c, and d-d can be scribed on. Lines a-a and d-d are marked square to the face of the stone, and line b-b is scribed from the rear to the existing fillet on the face of the stone. Line c-c is scribed from the rear parallel to line b-b. Note that line a-a is continued down the fillet perpendicular to the top bed of the stone.
The fillet lines are referred to as constants as they don’t need any special requirements for setting out.
Marking On The Mitre
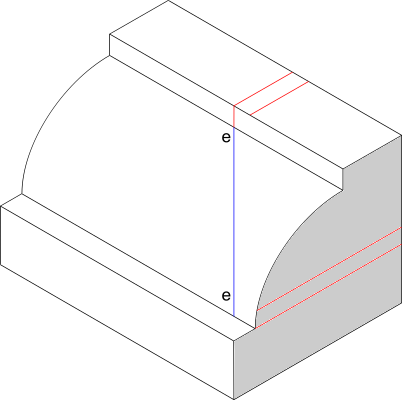
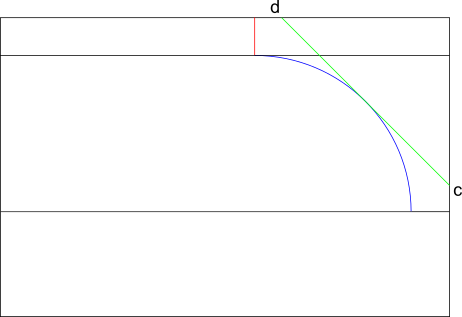
This figure shows the line of the mitre e-e on the mould. The line is drawn with a pencil rather than scribed, this is because the scriber leaves a shallow groove in the stone; in the case of a mitre this is undesirable as it will be seen.
To draw the mitre, a straight edge is held perpendicular to the top bed of the stone with the aid of a small square for accuracy. A pencil is held flat against the straight edge, and the straight edge is adjusted so that the tip of the pencil lines up with both the line marked on the top fillet and the corner of the stone. Running the pencil flat against the straight edge ensures that a straight line is drawn.
With the mitre line e-e drawn, looking directly at the front face of the stone with reveal that the straight line has described the curve of the ovolo mould.
With the curve of the ovolo mitre drawn, the next construction line is the initial chamfer marked as c-d on the rear of the stone.
Marking Of The Initial Chamfer
Viewed from the face of the stone, the line c-d will describe a straight line.
Providing that the stone being worked is small enough to move around easily, the process of marking on the initial chamfer can follow the same method described for marking the mitre.
To begin, turn the stone on to it’s rear face as shown in the illustration. As with the mitre, the chamfer can be now be marked on using a straight edge, this time held perpendicular to the face of the stone which is now horizontal.
With both the mitre and initial chamfer marked on to the stone, the return of the ovolo mould can now be worked following the methods described in how to work an ovolo.
A PDF version of this page is available